Friday, December 10, 2010

Tag 10!


I LOVE THIS TAG.

When Tim first came out with the Texture Fades, I kept all the packaging from customers who mail ordered. They came in long strips, which just didn't fit in ANYTHING. I ran the damask & flourish folders through. WOW LOVED it, but wasn't sure how I was going to use it...
Well, leave it to Tim. Snowman under ice!


This is a bit more of a close up, slightly different angle so hopefully you can see it better.
A very cool look and you should try it!

Only 2 more tags left...

Christmas Banner Swap

We had a banner swap on the Wisconsin Stampers Yahoo group. Too bad only 4 of us signed up, because the work has been fabulous! I'm looking forward to putting my banner together & showing it off. Here are the 4 pieces I made.
This one has a Tissue Tape garland at the top. The focal point is 5 pieces die cut using the Carved Ornament Die from Tim Holtz.


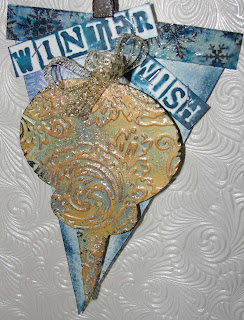
This one was done also using the Carved Ornaments die, and 2 different Texture Fades. One for the words, another for the ornament.
I used the Gold Paint dabber as a resist on the raised areas.

This one is kind of sweet. The image is from Lisa's Altered Art. The star was punched and covered with glitter & mylar. NOEL is cut out from the same texture fade used in the previous banner.
Again, Tissue Tape across the top.
The boingy stuff is from SilverCrow Creations. A vintage tinsel. Love that stuff!


This one again used words cut from the same embossing folder. You can't tell, but there's rock candy stickles on the words. SHIMMER-li-cious!
The ornament, die cut from the Carved Ornaments die and embosssed with the snowflake Texture Fade. I went over it with Silver Precious Metal by Viva, and a little glass glitter sprinkled on top. More vintage tinsel and wa-la!
I hope the ladies enjoy.

Thursday, December 9, 2010

Tag 7


The Pointsetta, made with the Tattered Flowers die. The Flourish die and the Wood Texture Fade.
God I love this tag!
I do love the look of the Rock Candy Stickles over the Distress Inked wood grain. In real life, it turns out very cool.
Since I placed the flower in a different position than Tim's design, I didn't feel it needed fru-fru at the top.
I also used Mica Flakes VS the rock candy stickles on the petals & leaves.


This shows up more in the close up.


Tuesday, December 7, 2010

Tag 6

This tag has just an amazing amout of texture! AND a very cool technique, with stamping onto the embossing folder. Had to try this several times to get a good impression. That is why I usually make several passes with a technique. Sometimes you like it, sometimes, not so much. BUT most of the time, the piece is useful! AND that's where the 2nd tag comes in.

I didn't want to crack open the Branch tree BIGZ Die, so I used Dijon Metal from Ten Seconds Studio and the Branch Tree Texture Fade to make my antler!

I also made my own 'journaling tag' from a piece of 110# manilla cardstock. I used a large round punch to clip the corners.
Because of the 'tag' near the top, I didn't think this needed any further embellishments hanging off it.


I had bought some Silver Viva Precious Metal Colour paint and using the brush thingy 'splattered' sliver ink across the tag.... My touch!

Hopefully you can see the effect more here.


I was playing around with some Liquid Watercolor (Sargant) making my own 'pearl spray'. I lost some of the effect with my overspraying of Pearl! But I do love the look and will do it again!

This piece had such a 'white out' effect, I went with it, buy adding the word BEAUTIFUL from Kabuka mold #9 on Pearl metal from Ten Seconds Studios. Again, I embossed the antlers from the Pearl metal using the Branch Tree Texture Fade.

And as long as I was 'splattereing away', I added the Silver Viva Precious Metal Colour overspray.


Hopefully, you can see the Pearl Metal 'word stick' and
antlers here.

And of course, you can see Tim's originals on his blog
here!

Sunday, December 5, 2010

Tag 4


And I'm all caught up! Now 5 is posted, and I have a busy day Sunday. AND REALLY NEED to get to sleep. It's 2:30 a.m. AUGH

.So on this one, instead of Facets, I just used Fragments. The package was open and let's face it, outside of the beveled edge, it's the same thing!

It's hard to see the effect of removing the Archival Ink in this picture, but it worked!

I used a piece of Stampbord for the piece at the bottom. Love Stampbord & Alcohol Inks!


Again hard to see, but there are rhinestones attached.

WHY doesn't bling like to have it's picture taken?

Tag 2


This tag may look simple, and basically, it is. BUT if you can look closely, there are layers. And I love that about this one. It's simple layers! I really looked forward to making this one. Ok, I look forward to making all of them!


This is a very cool technique. Making your own stamp
pad using Cut N Dry FELT and Distress Re-inkers. One I keep forgetting about, but love the look.


When doing backgrounds, I usually will make a couple, as 1 will turn out better than another.

As I was looking through my stash to use something other than the metal bird, I ran across some German Scraps.

Beautiful Angel Wings and a Chimney Sweep with Lucky Pigs!


Saturday, December 4, 2010

12 Tags Day 3


Well, I'm 'out of order' here! Which shouldn't be a surprise to those that know me :). I'll post up days 2 & 3 later.

I just HAD to work on tag 3. I loved the look and really wanted to make the flower from Tissue Tape. The first I made in a Christmas theme and the last image, more generic with a Best Wishes
on it.


Like Tim says "it's all in the details" and it rings true with this tag.

I love the Tissue Tape flower! I used tape from the Marketplace set rather than Symphony for both the bird & flower.

I hand dyed satin ruffle ribbon I had with aged mahogany Distress Ink. If you could see the variations in colors...

The flower center is actually a vintage pair of earings I clipped the backs off of. And lucky me, just 'happened' to have the very same tinsel 'just laying around'! LOL.


It is very cool how the bird turns out using the tissue tape and alcohol inks.

Now I KNOW I had moss 'somewhere', but couldn't find it. BUT I DID find Flowersoft and it made a perfect nesting material!


Thursday, December 2, 2010

Tag 1, Day 1

WOW. If you worked through this tag, you can certainly appreciate that adjective! I believe this one took me over an hour. BUT soooooooooo worth it!

Quite a bit of improvising. First, I had to run to a friends
to cut the house & fence as I had sold all those dies :).
I used the Swirls Grunge board. Well that made my house have some interesting texture! Well, when I got home and READ the directions, I had to modify the steps.
I ran my wonky house through the Texture fade, added the dabber paint, sanded, inked. Hmmmmm, Not looking right. More Ink, better. Oh YEAH, need to cut it up. But not about to 'reconstruct' a house. SO, I ran it through my Xyron to apply tape to the front & back of a paper cut house. THEN I could cut my Grunge house into strips AND place it on the paper house. This gave me alignment!


I didn't like the way the Crackle was making snow on my house, so I got out some Snow Writer. Better texture! While it was still wet, I added flocking and some transparent glitter.

Look at the texture on this baby!!!


I used the SnowWriter on the branches of the Clematis, which I turned into a tree. Almost forgot about that. I had to go out in the dark to look for something. I also added some of the glitter.

I was so surprised with the wreath as I had that out! Used in on my Reindeer Wish Tag

I Used Liquid Applique on the the tag number 25, and had covered it with Rock Candy Stickles.

Mica in the windows was a fabulous idea! LOVED IT.

DAMN. Forgot the Q-tip in the chimney....


Day 2 was recently posted. SIMPLER (thank you Tim) but cool techniques! Remember, EVERYTHING Tim uses for the Tag of the Day is on sale, 20% off!