Showing posts with label alterations dies. Show all posts

Tuesday, February 26, 2013

Getting my Gelli Girl on with the Umbrella man….

IMG_2406


Sassy! This turned out as a ‘finished’ (more or less) piece right off the Gelli plate!

I had made a stencil AND a mask from the Umbrella Man Die by Tim Holtz & have used the pieces on numerous Gelli prints. I die cut it using stencil material by The Crafters Workshop. You can by 12x12 sheets of their very material!


The word IMAGINE was done using another Tim Holtz Movers & Shapers die, cut out of Co-ordinations cardstock. The cut piece was a little boring and needed some paint anyway, so a perfect use!


I also used a piece of punchinella, which is where the fun bubble design on the Umbrella man comes from.


I laid the cut stencil onto a mildly clean (ok, there's some residual paint) Gelli plate.

I used my brayer to ink his hat & shoes black, the umbrella red and a bad mix of deep green & blue for the rest of him…

I then covered the stencil with the punchinella & brayered white over the top of the Umbrella man.


The cardstock IMAGINE, I laid face down onto the Gelli plate, and then brayered red paint onto the backside, trying to keep the paint inside, where the letters were. You can see the texture of the cardstock surrounding the word.


Since the brayer had cool design from the white brayered punchinella, I ran that around the plate slightly to frame the piece.

I removed the stencil & puncinella, then I did laid my clean white cardstock onto the plate & pulled it off.

The color on the right was from a second pressing into Distress Stain I had put on the Gelli plate from another pressing. It just added a little color to the edge.


IMG_2407

IMG_2403

These 2 were done using residual paint & pressings from other inkings.

Thursday, November 15, 2012

Star Bright Die

I am having fun with this new die from Tim Holtz! It's and L Die called Star Bright. The larger star is about 4.75" finished. The smaller is 2.5". VERY easy to fold as all of the crease lines are placed when the die is cut.


For this tag, I covered the star with Washi tape from Washi Wishes on Etsy. The HELLO & Hand washi are by 7Gypsies. The circles die at the bottom is also by Tim.


These stars were done using the Faux Riveted Metal technique Tammy Tutterow shows on her blog.


I left the smaller star 'plain'. I covered it with Metal Foil, and went over it with a Black acrylic Dabber, but never added the 'riveted' portion. I like it!
I have a feeling I'll be making A LOT of stars....

- Posted using BlogPress from my iPhone

Friday, June 15, 2012

First Flight


I was asked to join a new Yahoo group. A limited number of like minded creative talent at 50. It's a mixed media group. Not product specific, which I love because I use so many different products & mediums.


Our first swap is a tag. Mine is going to Neil in England. At first, I was going to do a sewing theme with a dress form. I already have that done. BUT, decided to switch it out with a more manly, steampunk, flight theme.


I had already done the background, and them my (or should I say another) package from Artistic Outpost came.

From the Diesel Punk set

PERFECT!


Diesel Punk

This tag also fits the June Referal progam theme of MASCULINE over at Artistic Outpost. BONUS!
I RARELY make things that fit ANYBODIES theme! LOL. Well, occasionally, but it's an on purpose.

I had already stamped the bi-plane from Pink by Design Flying High set and added foil highlight to it.

Flying High

The background had Distress Inks and Mists sprayed. There's actually a mask underneath from Tattered Angels, but you can't see it anymore. Remember when I posted below pic's of incomplete tags? Well, this is one of them.

There's plenty of Tim Holtz products used here too. The Pennant die was used to cut linen, the Numbers at the bottom, Gears, clock hands and OOOOOOOOO the Rivets & diamond plate Texture Fade!

You can see the 'hanger' I placed has a copper N charm & a dog tag (which I might smack around with a hammer before I finish & mail). Notice the jump ring? I put a spring from a defunced pen....
NO I DO NOT save everything! Geez, I can't believe you thought that.....


How do you love the log book??? Made it myself! I did watercolor the guys with Distress Ink & my Niji brush.

The stars at the top were stamped with Delicata by Tsukineko. GOD that ink has shimmer!
Delicata


This is a better view of the Gears & watch parts I added. There's also some washi tape & wallpaper tape in the background.


Friday, June 1, 2012

A "3D Matchbook ATC"!

Continuing along with my Matchbook design..... I've made this now in several different sizes.

Today, I am showing an ATC matchbook. What I love about this, not only do you have the constraints of the 2.5x3.5" facia, but a long thin inside to work!!!
Don't get me wrong. I do love the 'challenge of the 2.5 x 3.5" space. But let's face it peeps, WE'VE GOT STUFF and LOTS of it! According to my calculations, we'd have to make about a GA-ZILLION ATC's to use it all up!!!


I like to think of this design as 3D ATC Art. 95% of the stamps used are from Artistic Outpost. http://www.artisticoutpost.com/
I used both the LONDON CALLING & LONDON ELEMENTS sets.


The flag is leftover linen cut from the PENANNT Alterations Die. Have I mentioned how much I LOVE that die before???


And here's the INSIDER view! MORE THAN twice the ATC fun here!!!


Big enough to use the Hot Air Balloon from Tim's Remnants Set (CMS130). I trimmed it so separate at the matchbooks score line.

Added at the top, MORE linen Pennant flags!


For this piece, other than what's lised above, I used Cor-dinations cardstock, Archival Ink, Distress Ink, Distress Stain, Tissue Wrap and Pigment Markers.

AND because it's a 3D ATC, still plenty of ROOM to complete the backside with trading card information!


It's a cool design yes? Interested in a class? I think so!!!!


- Posted using BlogPress from my IPhone (never mind the typos).....

Monday, May 28, 2012

Honor tag

This tag features dies cut from T!M's Alterations die Old Glory & the Rosette strip die. The word FREEDOM, and the background words & stars are from the Americana Silhouettes stamp set.


Them main image & word HERO is from the HEROS set by Artistic OutPost.

I used Distress Inks & Archival Ink to stamp and alter the background of this tag.


- Posted using BlogPress from my iPhone

Thursday, May 24, 2012

Catch up

You all should know how much I LOVE t!m's new telephone & typewriter dies!
Love being able to add a personal message!


The rest of this verse is on the inside .

For the next cards, I used the new Wordplay die. Letters are about 1" or so.


Here I used the "waste" as a stencil for the background .


For this card I stamped the background with a Dylusions set.


Here I again used the Wordplay "waste" as a layering piece.


Love beige? The like is transferred to canvas cloth. The background is Walnut Stain Distress Ink rubbed onto the new Bubbles Texture Fade before running it through the Vagabond.


I did mist the Fade with water to create a softer look.


Added a piece cut from T!M paper using the pennant die.
I find myself using that die a lot.

Stay tuned more to come!!

Posted using BlogPress from my iPhone

Thursday, May 10, 2012

Art lives tag

I know ANOTHER tag!
CALLING ALL ARTISTS.....
Too much??? I just had to use that phone! I love that the 'dial' because I made it look like a paint palette! Clever? I think so....


Admittedly, there is A LOT going on with this one. And it 'could' have been left alone without the phone. But a girl dosn't always know when to STOP....
So the telephone is one of Tim's new Alterations Die. In another post, I make a card with the phone. Which is HUGE!


Once again, I stamped JUST the cap from the ink bottle into Rangers Metal Foil, while the jar is done one Matte-Krome paper.

The Circles stencil in the background is a Julie Fei-Fan Blazer design for The Crafters Workshop. Done up with, the new SPRING LIMITED EDITION DISTRESS INKS ( IN STOCK at Red Rubber!!!).
The harlequin stamp is a Dylusions, but all the rest are from Wendy Vecchi Studio 490 sets! EXCEPT the little pencils. Those are from the Secretary Pool set by Artistic Outpost. See how everything just works so well together?


Wendy says it all with this little phrase....
 
- Posted using BlogPress from my iPhone

Tag for a teacher

Well she's an artiste now! My friend Maggi stopped by to unload my home of her order, and I was inspired to work on this tag for her.

It uses Stamps from both Wendy Vecchi and Dylusions. Washi from Cavallini, and Tim's Ticket stamp & Alterations Strip die.

The background is done using Distress Ink. I also stamped one of the new background stamps from Tim & Stampers Anonymous. I really love that stamp lately!!!


Instead of using the Dylusions stencil, I used the Dylusions Stencil Alphabet stamp!


The pencil sharpener is stamped onto the Ranger Metal foil so it's all shinny & bright! Wendy sure has some awesome stamp sets!
And I carry them at Red Rubber, Paper and Ink!

Man tags

What's up with all the 'moustash' stamps & references lately? Is it the steampunk gentlemen?
This tag is done with Distress Inks & stains, Tim Holtz Stamps, the 'stash' from Wendy Vecchi, and some Making Memories letters (remember those magnetic stamps in the cool tin?).


In the background is one of my new favorite stencils from Dylusions...


Scissors washi tape from Washi Wishes on Etsy.

Pennant die & bookplate are from Tim's Alterations line. The CLOCK is from a Ten Seconds Studio Kabuka mold & Rock Star metal.


Another 'MAN TAG'


Steampunk tissue tape is from Tim's Commute set.
The numbers washi tape from Washi Wishes on Etsy.


Kimbal Brothers is a vintage ad image I printed. Again I used the stencil from Dylusions...


Posted using BlogPress from my iPhone

Wednesday, May 9, 2012

Ring ring

Oh look who made a card!!


Using Tim 's new Telephone Alteration die.

Cut with Kraftcore paper then lightly sanded.

The dial was cut using Rangers Metal Foil.

The back ground is stamped in Crimson Archival ink with a Dylusions number stamp by Dyan Reavery.

The Washi in the bottom is from Cavallini.

I made the notepad myself.


I cut white Matte-Krome paper to put behind the dial & highlights on the phone. Trying to keep it simple here!


Posted using BlogPress from my iPhone

Sunday, April 29, 2012

Carl's birthday card

Today is my husbands birthday!
I made this card for him.


All the dies are t!m of course!


Cut with the pennant die. Letters from the Typeset strip die.


I used the new tiny gears as rims & a larger gear for the stealing wheel.


Posted using BlogPress from my iPhone

Friday, March 30, 2012

Sewing themed tags!


I offered to demo for our calligraphy guild, along with several other artists. The theme was revamping & recycling . I had several backgrounds ready to rock from the CC101 classes, and decided on a sewing theme.

I used vintage lace, buttons and old sewing patterns along with sewing themed stamps & texture fades. I used 2 sets from Tim Holtz, and one of the newer ones from Wendy Vecchi! I also used Tim's Sewing theme Texture Fade.

I also used old book, music and dictionary paper.


This one was done using one of the backgrounds I created during my frenzy of "Layered Misting" for day 4 of CC101. I think I made about a dozen tags as I L.O.V.E. using The Crafters Workshop Stencils! I did add some Biscotti Perfect Mist, which you can tell in the shimmer of the close up. I overstamped with Archival Jet black, using a beautiful stamp from Wendy Vecchi's set "ART BY HAND' LCS068. I used the Tattered Floral die along with vintage book pages & music sheets. There's Rock Candy Stickles on the flower, which is shows up in real life... the 'lace' at the bottom is a paper lace, colored with Distress Stain in Peeled Paint.


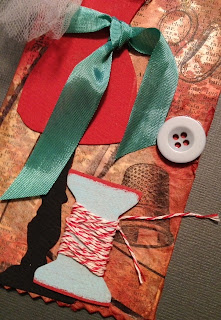
In this tag, the Dressform & spool are cut from Grungepaper, and painted using Dabbers. The background is done on book paper, inked with Stains left over on the craft sheet from making the flower in the tag above. MORE RECYCLING! There's vintage pattern paper adhered with Multi-medium on the bottom. The Stamps are again from the "ART BY HAND' set. I don't think you can tell as the ribbon is in the way, but the mini fasteners, are the PERFECT SIZE to use as the screw in the scissors!

A vintage button & threadding on the spool complete the look.


I love the way this turned out! I hand dyed the ribbon with Dusty Concord & Antique Linen Distress Stain. the vintage lace was died with Tea Dye & Vintage Photo Stains.
The tag was embossed with the Sewing set Texture Fade, then inked with Festive Berries, Vintage Photo & Walnut Stain Distress Inks.


I made a tiny tag from the Tiny Tag & Labels die. You can see Vintage pattern paper at the bottom of the tag.

The round piece is Grungeboard, painted with Picket Fence Distress Stain, stamped with Archival, then coated with Rock Candy Crackle. I then inked over it with some stains to add color.