Showing posts with label cling mount stamps. Show all posts

Thursday, May 23, 2013

Card: stamps, dies, embossing


I need to make some birthday cards. I had colored & cut out some stamped images from the Pondering Petunia set by Dylusions a while ago and wanted to use them. They are bright and colorful, fun and sometimes for me, it's nice to go bright.


Then banners are also by Dylusions from the Bags of Buntings set. The HB sentiment is from Hero Arts and stamped on canvas paper. I cut it into a banner. The yellow layer is cut from the Labels One set by Spellbinders and embossed with a Cuttlebug embossing folder. The layer behind that is a print I pulled from my Gelli Printing Plate as well as the scrap which I fashioned into a party hat. There's some leftover embossed Ranger Foil tape added to the hat as well.


The base card is made using a Card, Ornate#3 die by Sizzix. I then used the 3D Pop-up card die using LABEL Pop 'n Cuts insert.

(yes, I know it's difficult to tell as I photographed this black card against black cardstock, duh... me)
You'll have to use your imagination until I make another card.... sorry.....
 
This is another one of those dies that I LOVE the idea, LOVE the samples I see, but need to work with because they are so different from my style. When I become more in tune with these dies, I will be able to do 'my thing' more comfortably with them. It's just how I role!


657371 Card Ornate #3


Medium_657798 Pop 'n Cuts Insert, Label


Small_657591 Flip-it's square


Dyan Reaveley Dylusions Cling Stamps 
Dyan Reaveley Dylusions Cling Stamps


Posted using BlogPress from my iPhone

Blueprint center panel step card


I saw this design for a Center Panel Step Card posted via the Splitcoast Stampers site. It was done as a 5x7, so the center panel was quite large, This is done as an A2 size, but still offers a lot of room for embellishing!


I used watercolors & perfect pearls on watercolor paper to work with the oak leaf blueprint stamp by Tim Holtz.


I made this layering piece from Glassine paper. I used Distress Paint in Antique Linen for the base, misted it with water and dryed it. Then I placed a stencil on top, spritz with Terra Cotta ink from Tsukineko and Funky Fushia Dylusions sprays. I also went over it with Teal Tattered Angels.
I crumpled up the paper after I had dried it, hit it with a little water, recrumpled & dried it. It looks so cool in real life and has a different feel to it!


I used various Washi Tapes, a library card cut up and made a metal specimen tag to add to it.
The card offers quite a bit of space to embellish and folds flat for mailing.
 
 
This card is also known as a Front panel step card.
Here are the dimensions so you can give this a try!
 
Start with a piece of cardstock 8.5 x 5.5"
 
Cut 2 slits parallel to the long side of the card stock :

Mark your paper 1" in from the right edge, 1" in from the left edge,
Begin the cuts 1" from the bottom/short edge cutting to the 5.25" mark.

SCORE:
on the OUTSIDE PANEL (1" wide panel) at:
1" (mountain fold)
2" (valley fold)
5.25" (valley fold)

on the INSIDE/CENTER PANEL (3.5" wide panel):
score at 4.25" (mountain fold) (score ONLY the center panel, NOT onto the 1" side panels)

The CENTER PANEL is 3.5" wide x 4.25" long
Each SIDE PANEL is 1" wide x 3.25" long

MAKE a prototype with copy paper first. Do this once, and it will all make sense!

To see other ways of creating this card to include a greeting, go to www.papercookies.blog.splitcoaststampers.com

Friday, June 1, 2012

A "3D Matchbook ATC"!

Continuing along with my Matchbook design..... I've made this now in several different sizes.

Today, I am showing an ATC matchbook. What I love about this, not only do you have the constraints of the 2.5x3.5" facia, but a long thin inside to work!!!
Don't get me wrong. I do love the 'challenge of the 2.5 x 3.5" space. But let's face it peeps, WE'VE GOT STUFF and LOTS of it! According to my calculations, we'd have to make about a GA-ZILLION ATC's to use it all up!!!


I like to think of this design as 3D ATC Art. 95% of the stamps used are from Artistic Outpost. http://www.artisticoutpost.com/
I used both the LONDON CALLING & LONDON ELEMENTS sets.


The flag is leftover linen cut from the PENANNT Alterations Die. Have I mentioned how much I LOVE that die before???


And here's the INSIDER view! MORE THAN twice the ATC fun here!!!


Big enough to use the Hot Air Balloon from Tim's Remnants Set (CMS130). I trimmed it so separate at the matchbooks score line.

Added at the top, MORE linen Pennant flags!


For this piece, other than what's lised above, I used Cor-dinations cardstock, Archival Ink, Distress Ink, Distress Stain, Tissue Wrap and Pigment Markers.

AND because it's a 3D ATC, still plenty of ROOM to complete the backside with trading card information!


It's a cool design yes? Interested in a class? I think so!!!!


- Posted using BlogPress from my IPhone (never mind the typos).....

Thursday, May 31, 2012

Red, White & Blue Card

The COTM theme for JUNE @ WI Stampers is R, W & B.

I wanted to keep it simple & clean for a change. BELIEVE me this was harder for me than it looks. I wanted to add a collage image of a woman, but restrained myself....


The main stamps are from a set called bags of bunting by Dylusions for Ranger. Stamped in Crimson & Ultramarine Archival ink.


I stamped the 'stripes' using a stamp from the Americana Silhouette set by Tim Holtz.

OOOHHHH, and the "calligraphy", all mine (wink).

Wednesday, May 30, 2012

I made it myself!

I had this bright idea today.
Ok not brilliant but it executed well.

And I think I'll be making this style again!

Actually, I have, in multiple sizes...


If you look closely, I made a matchbook! The closure are made using 2 circle punches.


The stamp is vintage Tim! Lol!!! One of the first stamps I have by him! I colored it with markers before stamping. 2 sets of Wings & the hat are cut, and layered with black foam squres.
The background paper is from one of the Paper Stashes, inked on the edges with Weathered wood Distress Ink & stamped with a solid butterfly in pumice stone. The tag is a TIM a long with the verse stamped in archival.


This is the first run through below. Inspiration for the final design above. I decided it needed 2 scores at the top to give it more dimension, and 'fold' into the small fold up at the bottom.


The card is made from Tim's Paper Stash. It's inked on the edges with weathered wood distress ink.
The stamped coffee ring & splatters are inked with vintage photo and are part of an older stamp set.


The image is from Altered Pages and is done as an image transfer into PPA. Since I printed from my laser printer the image turned out nice & crisp.

The phrase is cut from the sentiment stamp set called Quotes & Quotables by Artistic Outpost. The stamp is great because while it's designed to be used as 1, it has lines that can be used individually! LOVE that!

Posted using BlogPress from my iPhone

Monday, May 28, 2012

Honor tag

This tag features dies cut from T!M's Alterations die Old Glory & the Rosette strip die. The word FREEDOM, and the background words & stars are from the Americana Silhouettes stamp set.


Them main image & word HERO is from the HEROS set by Artistic OutPost.

I used Distress Inks & Archival Ink to stamp and alter the background of this tag.


- Posted using BlogPress from my iPhone

Happy Memorial Day!

First, a million thanks to all who have served and those who continue to serve! What amazing people are military are!

In humble appreciation, I'm beginning a banner project, and plan on adding more flags to it as i go along.
The flags are about 5x8", so there is a lot of good surface area.  The background is manilla cardstock, majorly distressed & aged. I used Distress Inks in Old Paper, Vintage Photo & Walnut Stain.
I used T!M's mixed media stamp set & basic backgrounds set by Dylusions.
I stamped with Archival Crimson & walnut stain.
I also did a Brush-less watercolor technique using T!M's Americana silhouettes set in Faded jeans distress ink.

I used 2 of T!M's Alterations Dies: Rosette, Old Glory Bigz


The 'focal' images are from Artistic Outpost's HEROS set.

Friday, May 11, 2012

My moms day card for my mom!

I have a "joke" with my dad. He calls me his favorite daughter.
I'm the only daughter (to the best of my knowledge)..
On both my mom & dads phones I'm listed as "favorite daughter " so couldn't resist stamping this in my moms card!


The lovely Flower & Mason Jar are by Wendy Vecchi's Studio 490 line. I LOVE this set! The Essence of ART (LCS080).


The mason jar is stamped onto dur-a-lar (an acetate). The flower is watercolored Distress Ink.


The tag, letters & Kraft glassine are Tim Holtz.
The background stamp is from Stampington & Co., and is done in Seedless Preserves Distress Ink spritzed with water. Overstamped w/a dot stamp in Worn lipstick.

HAPPY MOM'S DAY to all you momma's!! Enjoy your weekend!!


Posted using BlogPress from my iPhone

Do more of what makes you happy...

A TAG!!!!
For my friend from the south.
He's a stalker....


This is "Twinkie" from Stampotique. LOVE THESE STAMPS! They are soooo fun to work with!
He's colored in with Copics.


There's a lot going on here. Circles template from The Crafters Workshop,  word quotes from Wendy Vecchi Studio 490 line (Art School, Essence of Home) and Artistic Outpost's Typeography set, Stampotique, Circles from Stamp Diva ....


Oh and of course some Tim Holtz...
The Admit One stamp and the new Spring Distress Inks!


It's nice to RAK a friend!!!


- Posted using BlogPress from my iPhone

Monday, April 30, 2012

Newspaper boy "read all about it!"

This is such a cool design for a card. I've blogged the base design before. I made a card for T!M's birthday with it.

This card uses Stampers Anonymous Cling Mount Stamp sets from both T!M and Wendy Vecchi. Distress Stain, Archival Ink, Idea-ology, and my own doodling on paper! AND of course, the new Commute Tissue Tape! (I have to admit, I really got it bad for Washi/tissue tapes).

The base is 5.25" x 12".
Score the card at 2", 4", 8", 10"
This gives you the basic z fold of both the right & left panel

The "flags" for the front are cut from a 4" x 5.25" panel.
Using a large background stamp or design, you'll want to stamp the panel & do any coloring.
THEN cut it into three 4" x 1.75" "strips".


When the card is closed, as above, it appears as a normal card front. OK, normal is 'relative'...


I used pop dots to raise the boy up to add dimension.  
AND PEEPS, don't do as I did and put one behind the boys head. That panel moves away from the middle panel... Just a little friendly advice...


See what I mean? This shows the card beginning to slide open...


Are you starting to see how cool this can be??


This is a top view, which will help you 'visualize' the double Z.


This a view of the left side. A strip/flag is attached to the top & bottom. On the right side of the card, the strip/flag is attached to the middle.


If you have questions, contact me. It's really a design that can be used in SO many different ways! A neat way to work with a large busy stamp, or like I did, collage a card!
 

- Posted using BlogPress from my iPhone

Friday, March 30, 2012

Sewing themed tags!


I offered to demo for our calligraphy guild, along with several other artists. The theme was revamping & recycling . I had several backgrounds ready to rock from the CC101 classes, and decided on a sewing theme.

I used vintage lace, buttons and old sewing patterns along with sewing themed stamps & texture fades. I used 2 sets from Tim Holtz, and one of the newer ones from Wendy Vecchi! I also used Tim's Sewing theme Texture Fade.

I also used old book, music and dictionary paper.


This one was done using one of the backgrounds I created during my frenzy of "Layered Misting" for day 4 of CC101. I think I made about a dozen tags as I L.O.V.E. using The Crafters Workshop Stencils! I did add some Biscotti Perfect Mist, which you can tell in the shimmer of the close up. I overstamped with Archival Jet black, using a beautiful stamp from Wendy Vecchi's set "ART BY HAND' LCS068. I used the Tattered Floral die along with vintage book pages & music sheets. There's Rock Candy Stickles on the flower, which is shows up in real life... the 'lace' at the bottom is a paper lace, colored with Distress Stain in Peeled Paint.


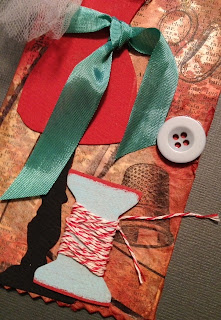
In this tag, the Dressform & spool are cut from Grungepaper, and painted using Dabbers. The background is done on book paper, inked with Stains left over on the craft sheet from making the flower in the tag above. MORE RECYCLING! There's vintage pattern paper adhered with Multi-medium on the bottom. The Stamps are again from the "ART BY HAND' set. I don't think you can tell as the ribbon is in the way, but the mini fasteners, are the PERFECT SIZE to use as the screw in the scissors!

A vintage button & threadding on the spool complete the look.


I love the way this turned out! I hand dyed the ribbon with Dusty Concord & Antique Linen Distress Stain. the vintage lace was died with Tea Dye & Vintage Photo Stains.
The tag was embossed with the Sewing set Texture Fade, then inked with Festive Berries, Vintage Photo & Walnut Stain Distress Inks.


I made a tiny tag from the Tiny Tag & Labels die. You can see Vintage pattern paper at the bottom of the tag.

The round piece is Grungeboard, painted with Picket Fence Distress Stain, stamped with Archival, then coated with Rock Candy Crackle. I then inked over it with some stains to add color.