Showing posts with label ranger. Show all posts

Wednesday, November 9, 2011

HO3

Get it? HO3 ....
Give it a little time.... LOL!

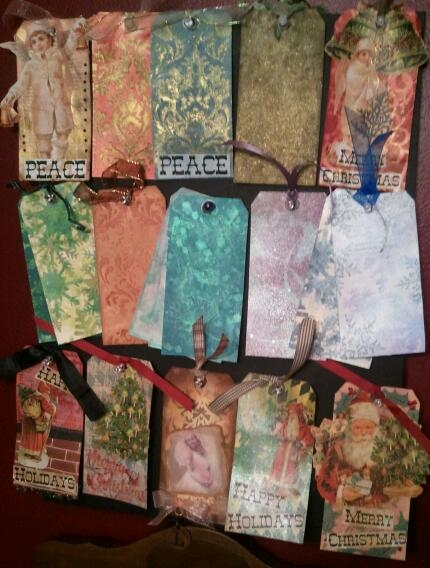
So this mornings tag was done using one of Tim's new Cling Mount Stamp sets CMS118 Christmas Memories! I love the retro look of this set, and seriously need to do it in Silver, Pink and Lime!

But for today, I'm keeping more traditional. Over on Linda's Studio L3 blog her Grungy Monday Challenge is a masking technique based on one of Tim's 12 tags from 09. Well it's quick and easy enough to do. Masking has been around for as long as I've been stamping, which is almost 20 years! And I'm POSITIVE, it was around long before that! Why else would there be a dozen differnt products out there to aid in it? But I was lazy and just used a piece of cardstock rather than cutting masking material. So there, making in it's earliest, primal form!


I stamped the Santa on the tag with Archival in Crimson, then onto a 2nd piece of 110# cardstock & trimmed him out. This piece became my mask. Laid the mask over Mr. C, and Inked around him using Tumbled Glass and Broken China Distress Ink. I also use the mask when putting Picket Fence Distress Crackle paint by his feet so his boots didn't get smutz on them!

Again with the mask to stamp the 'star' in a Gold Dabber.

See the shinney boots and belt? Enamel Paint by Ranger. There's Rock Candy Stickles on the 'fur' of Mr.C for a bit of sparkle too.

The Fragment was inked with BOTTLE Alcohol Ink, and HO3 adhered behind it. HO HO HO. Ho to the power of 3. Are you having a DUH moment or did you get it?


And I know you have to turn your head just a tad to the left, but you'll want to do this to see that really cool tissue tape from Cavallini!

When I get around to it, I'll fix it.... 


Tuesday, November 8, 2011

Debossed gloss

So I had to give Tammy Tutterows technique a try, here's my results on coated cardstock from LCI paper.

After inking, then debossing, I used both Distress Crackle and Crackle accents on each piece, side by side to see if I could tell a difference between the products. There was really no visible difference I could see.


Each piece is stained with Distress Stain in Fired Brick and Wild Honey.


After scrapping with the Crackle & heating, I went over each piece with a little Vintage Photo Distress Stain which gave it a cool look.


I've taken Embossed papers and coated them with Multi Medium and/or Glossy Accents in the past. This gives them a sheen and lovely finished look I love! Plus, you can sprinkle glitter on them for a little shimmer during the holidays!

This technique gives another look I love!


Th


The Artist Tools Tag


The background of this tag is Seedless Preserves Distress Ink over sprayed with Pewter Radiant Rain.  The stamped images are from Wendy Vecchi's TOOLS FOR ART (set LCS049). Love it!


The paint brush is inked and coated with Crackle Accents by Ranger. It's heated to give an aged look because if you heat it for a while it will bubble up!.  The Kraft Glassine is inked with Distress Ink in Crushed Olive and Festive Berries and de-bossed. Then Crackle Accents are scrapped across the glassine ala Tammy Tutterow's technique, but with a twist.


I love the little vial, full of glass glitter! It says "genuine ideas" on it!


Adhering Kraft Glassine


Supplies needed:Embossed Kraft Glassine
Glossy Accents
Craft Iron
An inked tag or other project


This isn't an excercise on how to ink a tag, but
getting the Kraft Glassine, which as an oily feel to stick! In a previous post, that was an issue with the Vintage Valise Journal.

So i had emailed Tim, and he suggested this process. What I wanted to ensure, was that I wouldn't loose the integrity of the embossing when ironing the embossed glassine to a base.


As you can see in this closeup, the raised dots remain in tack! The Glossy Accents smooshes down and literaly will begin to melt and adhere within 10 seconds. Remember it's a CRAFT IRON, you're not pressing a shirt (who DOES that?)!

Pretty Sweet!


The technique on the lower half is shown today by the lovely Miss Tammy Tutterow on her blog. She calls it the FROSTY DE-BOSS! But she was working with snowflakes. I wanted to see how it worked with a different folder (I tried 3 different designs) AND Rangers Crackle Accents (because frankly, I'm getting a bit ticked with the Distress Crackle Paints). AND my Distress Crackle Rock Candy was JUST about empty and I really didn't want to crack open a new one!

Monday, November 7, 2011

Tag and tip!

So remember the other day I emailed Tim Holtz?  I had a question about the Kraft Glassine and adhering it to Grungepaper and what the best adhesive was. I tried Multi-Medium. That didn't work. He said it would, but you need to wait a REALLY LONG TIME. We don't like to wait.... 
I had good success with my ATG and Red Liner tape (WonderTape). One of the ladies tried ScorePal tape which didn't seem to work. And another used the Glossy Accents. Again, need to wait on the dry time, but it did work. I also tied hot glue. AND while in some areas it held, it others, it let go.

SO, back to Tim. What he recommended was Glossy Accents AND a craft iron. He said it would be cool. Damn, he was right! I tried it on this tag. SMOOOOOOOTH as silk!

I am going to have to do 1 more experiment with embossed glassine... THEN I'll be sold!


Friday, November 4, 2011

TAGS! Beautiful backgrounds and more!

SO, just what do you get when you combine a bunch of great products???
The answer is: a really fun week of playing!!!!

On tags, I was challenged to work with stencils from The Crafter's Workshop, Distress Inks & Stains, Radiant Rain and Vintage Scraps....
Firstly, I HAVE to say using the words CHALLENGED and WORK, well lets just say I need a synonym. Or is that antonym? Better ask the 10 year old....
I loved it!!! I just couldn't stop. BUT the good thing, I'm getting into Christmas Holiday themes! I used Photoshop to create the word phrases for the bottom. YES I could have used a Microsoft program, but I REALLY need to practice more with PSE!
IF ONLY the shimmer of the Solar Gold showed as well...
Hey, guess what I did? Made my own 'tissue(less) tape'! Need to work on that....
Count down to Christmas is what I call this one. That would be the one up there. Above....
See the goldish-tanish one? With the brocade design. It looks almost embossed IRL. Tough to see in pictures.

I got wise this time. 

I'll wait for the laughter to subside.....

Done yet?

I actually wrote on the back of the tags, steps I took & colors!
No more relying on the ol' memory!
Pretty smart hugh?


These 2 on the left are a 2 stepper. First you mist the tag. THEN using the ink & spray that's left on the stencil, you STAMP onto the 2nd tag! WHO woulda thunk?
And one of my favorite techniques, Vintage Photo. But this is done with a brocade twister!

If I tell you, I'd have to kill you.... 

LOL

No really.....

Just come see me at the demo. I'll let you in on the secret!!!!

Friday, October 14, 2011

Halloween Tag!

I LOVE Halloween.
LOVE IT! And I really love making tags.
So happy Tim Holtz & Sizzix have come up with such amazing Dies and Texture Fades!
This tag will also work perfectly for the both the Grungy Monday 22 challenge at Studio L3 AND the HALLOWEEN or GOTH challenge on the Simon Says Stamp blog.

The background of the tag is done with Mustard Seed Distress Stain, accented with Ripe Perssimons! I stamped the back with the speckled part of the blood stain stamp (Stamper Anonymous CMS068) and the bats (CMS050).
I used the Kraft Glassine paper (LOVE that stuff) amd ran it through the Halloween Words Texture Fade, then accented it with the new Limited Edition Distress Inks in Grape Preserves and Ripe Perssimons!

The Rickety House has SOOOO many layers!
Black paper, Picket Fence Distress Stain, Rock Candy Crackle paint.
In the windows tulle, Tissue Tape, Mustard Seed Distress Ink, Perfect Mist's in Heirloom Gold...

The fence was created on book paper, misted with Maya Mists in black & silver using a stencil and punched with a Martha Steward Punch.

Again with the Kraft Glassine paper run through the Halloween Words Texture Fade, then accented it with the new Limited Edition Distress Inks in Grape Preserves and Ripe Perssimons!

Here I used Fired Brick Distress Ink, then sprayed it with Perfect Mists in Forever Red. Dripped a little water on and dried it. Stamped the blood splater in Fired Brick and stamped the Skeleton (CMS050) in Picket Fence Distress Stain.

More Kraft Glassine paper run through the POISON Texture Fade, then accented it with the new Limited Edition Distress Inks in Grape Preserves and Black Soot Distress Stain. Then I smooched it into just a bit of Heirloom Gold Perfect Mist!

Guess I better go make it look like I did something around here......


PS: I do have 4 more sets of the new
FALL Limited Edition Distress Inks  
available. ON SALE for $15.30 (originally $17.99) plus applicable tax and shipping!

Also taking orders for the WINTER LE INKS, pre-paid at 25% off!!!

Monday, October 10, 2011

Another Halloween card

From my 'roll' of the last couple weeks using the Vintage cabinet card dies and new Halloween texture fade.  This insert was done on Cor-dinations Black Magic in orange. I also used Tim's Pennant On the Edge, mini rosette strip and the Mini M&S cat & crow.


BOO! Halloween Card


Yes, it's true. I don't often make cards. STRANGE isn't it? I make a lot of backgrounds, work through techniques, but don't always make cards... Well THIS is a card I made last week! I used A LOT of Tim Holtz on this! His new Halloween Texture Fade, Mini-Rosette strip Die, The Cabinet Card and mini Cabinet Card Dies, Pennant On the Edge, Tissue Tape AND Grape Perssimons LE Distress Ink!
I'm digging this white China Marker I got at Hobby Lobby. It's kind of waxy. I run the paper (110# cardstock) through the embossing folder, rub the waxy pencil over the high spots, run the inkpad across the texture fade and run it through again to get the ink into the debossed areas of the card. The waxy pencil is a resist. It's nice and clean and adds to the Letterpressed look I love!!! Did I mention the Rock Candy Stickles? I LOVE THAT STUFF!

Altered Trading Block-Halloween

This ATB is done for a swap on the Chubby ATB group. It actually started out as another piece.... But the background made for a great beginning for this block. 


This is the 'Poe' side. Ten Seconds metal with an image of Edgar from a free Halloween Craft sampler from www.DigitalCollageSheets.com.


This side has pieces cut from paper I embossed using Tim's new Halloween embossing folder. I ran the paper through the folder, using a white China marker (it's kind of waxy to create a resist) I went over the high points of the lettering. I spread Twig Distress Ink over the folder, placed the paper aback in and ran it through the Vagabond again. Wiped off ink from the raised part and got this cool look. I cut the words I wanted out, and placed them behind a piece of acetate which I had run through the Rays and Circles texture fade.

 The base of the block was painted with a Black Dabber by Ranger. I cut 'stamps' from foam using the Gears & Clock dies, and stamped onto the black using silver & white dabbers. Remember it was starting out as another piece. Since there are so many layers, you don't really notice that, but it's there.


Autumn Gathering Tag

Fall in Wisconsin is so lovely and we are fortunate to live in a beautiful part of the state. Wooded, hilly.... The new strip die by Tim Holtz is a great reflection of this time of year! Autumn Gathering cuts a variety of leaves, twigs, nuts....
 I punched a circle from scrap, the cut the center out. I used Multi-medium to attached the leaves. I cut 2.5" strips of paper in various colors and textures. Before running through the Vagabond with the die, I either stamped them (words, patterns, textures) and/or spritzed them with Perfect Pearls Mists.

The background of the tag was done using Gesso and Distress Stain. Then I stamped the texture pattern (Stampers Anonymous) and dots (Hero Arts) using Twig, the new Distress Limited Edition ink. The pretty scallop on the left is from Sizzix as well as the embossing folder. The tissue tape is by 7 Gypsies. And of course the tag is finished with Adornments by Tim Holtz.


Wednesday, October 5, 2011

According to some....

One day zombies will take over the world. Zombie kitties? Just another of the Halloween Cards I've been working on.This uses an image of a cat, who 'used' to have an apron & chef's hat on....
Lot's of Tim 'love' here. Cabinet Card Alterations dies (mini AND Bigz), new Halloween Texture Fade, Tissue tape, Pennant On the Edge die, Kraft Glassine paper, the mini Pumpkin Mover & Shaper, Picket Fence Distress Stain, LE Distress Ink, Core' dinations paper..... Oh yeah, and a little Rat punch by Martha Stewart...


Wednesday, June 22, 2011

Altered Tee Shirt w/a Slight modification ....

Needed something to give that " finished " look.....


So I stamped some 'dots' in black randomly around. I love how this turned out.


And it fits in perfectly with the challenge over at the Simon Says Stamp site this week. The challenge is SHOW A WORD!

Tuesday, April 13, 2010

A Caged Woman

I love it when I can 'do my own thing'. I'm making samples & backgrounds for some upcoming classes & demos. The new ALterations Dies are in from Tim Holtz' new spring collection and I've been DIE-ING to use it... LOVE this birdcage!!! I inked it with Distress Inks. The woman is a free image (will post from where later). I accented her jewels with Rock Candy Stickles (LOVE THIS STUFF) and added Mica to the bottom. And YES, it's newspaper on the bottom of the cage...

Saturday, October 31, 2009

Faux Chihuly with a Twist....


I'm demoing a product called Dura-lar by Grafix next weekend at Artist & Display. It's thick, not 100% transparent, but can be shaped (carefully) in warm water. The plan was to use glass paints, which I have none of, and since I love alcohol inks, thought this would be a great substitute.
I've had this great song by Kirstin Andreassen going through my head ( http://www.youtube.com/watch?v=EELEjeYzfjM ) it's SO FUN! "Crayola dosn't make the color for your eyes". Great inspiration for color!

The 'look' we're going for is that of Dale Chihuly ( http://www.chihuly.com/ ) an amazing glass artist. His colors are fabulous and his pieces undescribable! Tough to replicate with alcohol inks because of the way they react.

I'm going to play around some more & see what I can work out. Not sure Mr. Chihuly would appreciate me calling this a Drunken Chihuly Technique (due to the ALCOHOL inks) but it makes me laugh. So for now, it's Faux-Chihuly with a Twist!